Cách upload tập tin lên ChatGPT là một trong những thủ thuật hữu ích, mang lại cho bạn nhiều khả năng sáng tạo và linh hoạt hơn khi sử dụng công cụ AI này. Vậy làm sao để tải tài liệu lên ChatGPT? Cùng ODEX.VN tìm hiểu qua bài viết sau đây nhé!
I. Upload tập tin lên ChatGPT để làm gì?
Việc tải tài liệu lên ChatGPT mang lại cho bạn nhiều lợi ích. Đặc biệt là nếu bạn là một nhà phát triển hoặc người dùng muốn tận dụng tối đa khả năng của AI. Một số lợi ích chính là:
- Xử lý các loại tệp khác nhau và sinh ra câu trả lời phù hợp. Kiểm tra, sửa lỗi và hoàn thiện các đoạn mã, văn bản hoặc dữ liệu một cách hiệu quả.
- Tạo ra các nội dung sáng tạo và thú vị từ bản thảo của bạn,
- Học hỏi và nâng cao kỹ năng của bạn trong các lĩnh vực khác nhau.
II. Cách upload tập tin lên ChatGPT vô cùng nhanh chóng
Bước 1: Đầu tiên, bạn vào trang chủ của ChatGPT, gõ câu lệnh sau:
Generate a Js script that creates a button with the text 'Submit File' and inserts it into the DOM before an element with the class '.flex.flex-col.w-full.py-2.flex-grow.md\:py-3.md\:pl-4'. The button should have a green background color, white text color, 5px padding, no border, 5px border radius and 5px margin. The script should also create a progress element and insert it into the DOM before the same element. The progress element should have a width of 99%, height of 5px and a grey background color. Inside the progress element, there should be another div element representing the progress bar with a width of 0%, height of 100% and blue background color. When the button is clicked, it should create an input element of type 'file' that accepts '.txt', '.js', '.py', '.html', '.css', '.json' and '.csv' files. Once a file is selected, using an async it should be read as text and split into chunks of size 15000. using async Each chunk should be submitted into a conversation by doing the following:
 async function submitConversation(text, part, filename) {
        const textarea = document.querySelector("textarea[tabindex='0']");
        const enterKeyEvent = new KeyboardEvent("keydown", {
          bubbles: true,
          cancelable: true,
          keyCode: 13,
        });
        textarea.value = `Part ${part} of ${filename}: \n\n ${text}`;
        textarea.dispatchEvent(enterKeyEvent);
      }.
The progress bar should be updated after each chunk is submitted within the for loop as follows
progressBar.style.width = `${((i + 1) / numChunks) * 100}%`;
 and should also check if chatgpt is ready with this code:
chatgptReady = false;
      while (!chatgptReady) {
        await new Promise((resolve) => setTimeout(resolve, 1000));
        chatgptReady = !document.querySelector(
          ".text-2xl > span:not(.invisible)"
Đoan prompt này sẽ giúp bạn tạo ra:
- Một nút Submit File
- Một thanh tiến trình theo dõi dữ liệu được ChatGPT tiếp thu đến đâu
- Các thành phần xác định các định dạng tệp, nếu tệp có chứa hơn 15000 ký tự thì sẽ chia ra ra làm nhiều phần nhỏ, sau đó đưa vào ChatGPT
- Chứa mã hướng dẫn cách nó chèn thông tin vào ChatGPT
Bạn chờ ít phút để ChatGPT xuất ra đoạn mã JavaScript
// Create the button
const button = document.createElement('button');
button.textContent = 'Submit File';
button.style.backgroundColor = 'green';
button.style.color = 'white';
button.style.padding = '5px';
button.style.border = 'none';
button.style.borderRadius = '5px';
button.style.margin = '5px';

// Create the progress element
const progress = document.createElement('progress');
progress.style.width = '99%';
progress.style.height = '5px';
progress.style.backgroundColor = 'grey';

// Create the progress bar inside the progress element
const progressBar = document.createElement('div');
progressBar.style.width = '0%';
progressBar.style.height = '100%';
progressBar.style.backgroundColor = 'blue';

// Append the progress bar to the progress element
progress.appendChild(progressBar);

// Find the target element
const targetElement = document.querySelector('.flex.flex-col.w-full.py-2.flex-grow.md\\:py-3.md\\:pl-4');

// Insert the button and progress element before the target element
targetElement.parentNode.insertBefore(progress, targetElement);
targetElement.parentNode.insertBefore(button, targetElement);

// Add click event listener to the button
button.addEventListener('click', async () => {
  // Create the file input element
  const fileInput = document.createElement('input');
  fileInput.type = 'file';
  fileInput.accept = '.txt, .js, .py, .html, .css, .json, .csv';

  // Function to handle file selection
  fileInput.addEventListener('change', async (event) => {
    const file = event.target.files[0];
    if (file) {
      const reader = new FileReader();
      reader.onload = async (e) => {
        const fileContent = e.target.result;
        const chunks = chunkText(fileContent, 15000);
        const numChunks = chunks.length;

        for (let i = 0; i < numChunks; i++) {
          const chunk = chunks[i];
          const part = i + 1;

          await submitConversation(chunk, part, file.name);
          progressBar.style.width = `${((i + 1) / numChunks) * 100}%`;
        }

        progressBar.style.backgroundColor = 'blue';
      };

      reader.readAsText(file);
    }
  });

  // Trigger the file input dialog
  fileInput.click();
});

// Function to split text into chunks
function chunkText(text, chunkSize) {
  const chunks = [];
  for (let i = 0; i < text.length; i += chunkSize) {
    chunks.push(text.slice(i, i + chunkSize));
  }
  return chunks;
}

// Function to submit a conversation
async function submitConversation(text, part, filename) {
  const textarea = document.querySelector("textarea[tabindex='0']");
  const enterKeyEvent = new KeyboardEvent('keydown', {
    bubbles: true,
    cancelable: true,
    keyCode: 13,
  });
  textarea.value = `Part ${part} of ${filename}:\n\n${text}`;
  textarea.dispatchEvent(enterKeyEvent);

  // Check if ChatGPT is ready
  let chatgptReady = false;
  while (!chatgptReady) {
    await new Promise((resolve) => setTimeout(resolve, 1000));
    chatgptReady = !document.querySelector('.text-2xl > span:not(.invisible)');
  }
}

Bước 2: Bấm vào “Copy code” để sao chép mã
Bước 3: Bạn nhấn chuột phải > Inspect
Bước 4: Chọn tab “Console” > Bạn dán toàn bộ code vừa sao chép vào đây > Enter.

Lúc này bạn sẽ thấy có thêm nút “Submit File” xuất hiện ngay bên dưới.
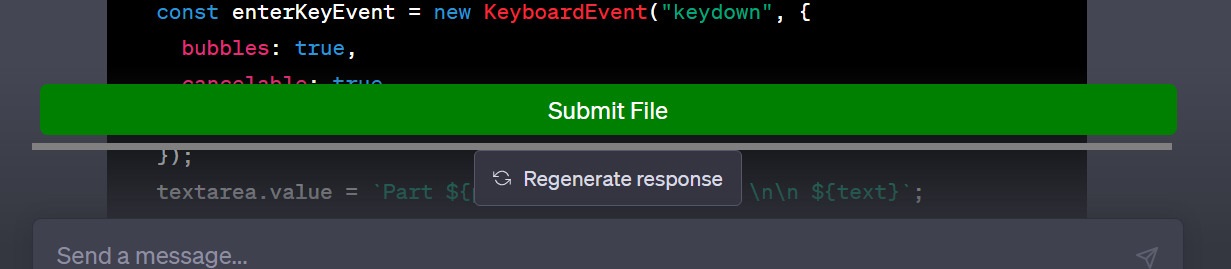
Bước 5: Bạn có thể bấm nút để thêm tài liệu của mình. Thanh màu xanh là thanh tiến trình, khi nó chạy hết tức là văn bản được up lên hoàn tất.

Lưu ý: Các loại tệp được hỗ trợ bao gồm:
- Tệp văn bản (.txt)
- Tệp JavaScript (.js)
- Tệp Python (.py)
- Tệp HTML (.html)
- Tệp CSS (.css)
- Tệp JSON (.json)
- Tệp CSV (.csv)
III. Cách chuyển các đoạn mã thành Bookmark
Nếu bạn muốn tiện lợi hơn khi sử dụng ChatGPT và không muốn nhập lại đoạn mã này mỗi lần bạn muốn tải tệp lên ChatGPT, bạn có thể chuyển đoạn mã này thành một bookmark để sử dụng thuận tiện hơn.
Bước 1: Bạn bấm “Copy Code” để sao chép lại đoạn mã ban nãy
Bước 2: Bấm “New Chat” để mở khung chat mới
Bước 3: Gõ lệnh “please convert the following code into bookmarlet” sau đó dán mã vào > Enter
Bước 4: Tại kết quả mà ChatGPT xuất ra, bạn bấm “Copy Code”

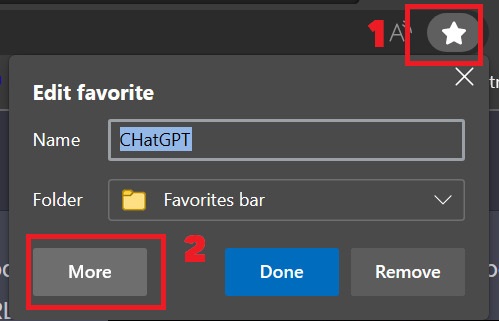
Bước 5: Bạn nhấn vào biểu tượng Bookmark trên thanh công cụ > Chọn “More”.
Bước 6: Điền tên bookmark (bạn điền tên gì miễn sao dễ nhớ là được)
Dán đoạn code vào phần URL
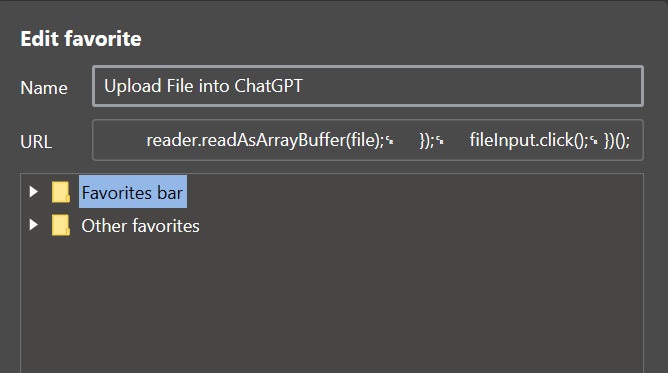
Sau đó bấm Save. Bookmark vừa tạo sẽ xuất hiện trên thanh công cụ
Vậy là sau này, khi muốn thêm nút Submit File để tài tài liệu lên thì bạn chỉ cần nhấn vào bookmark này là ra, khỏi phải chạy lại code mất thời gian.
IV. Lời kết
Bằng cách sử dụng đoạn mã mà mình giới thiệu trong bài viết, bạn có thể dễ dàng thực hiện cách upload tập tin lên ChatGPT và nhận được kết quả mong muốn. Việc này mang lại cho bạn nhiều khả năng sáng tạo và linh hoạt hơn khi sử dụng ChatGPT. Odex.vn chúc các bạn áp dụng thành công!